As a parent, ensuring your baby’s health and safety is paramount, and a critical step in this journey is properly sterilizing feeding equipment. With delicate immune systems, especially during their first year, babies are vulnerable to harmful bacteria that can thrive in milk residue left in bottles. While boiling water has been a time-honored method for generations, modern steam sterilizers offer an alternative. This guide will delve into both approaches, comparing their effectiveness, convenience, safety, and cost, helping you decide which method aligns best with your family’s needs.
Why Sterilize Baby Bottles?
Newborns and infants possess underdeveloped immune systems, making them susceptible to infections from bacteria, viruses, and fungi that regular washing might miss. Sterilization goes beyond mere cleaning; it employs high heat or chemicals to eliminate these microscopic pathogens, providing an essential layer of protection. This is particularly crucial for babies under three months old, those born prematurely, or infants with compromised immune systems. Without proper sterilization, milk residue can become a breeding ground for germs, potentially leading to gastrointestinal issues like diarrhea and vomiting.
Traditional Method: Boiling Water
Boiling water is a conventional and accessible method for sterilizing baby bottles and accessories. It leverages high heat to kill common microorganisms.
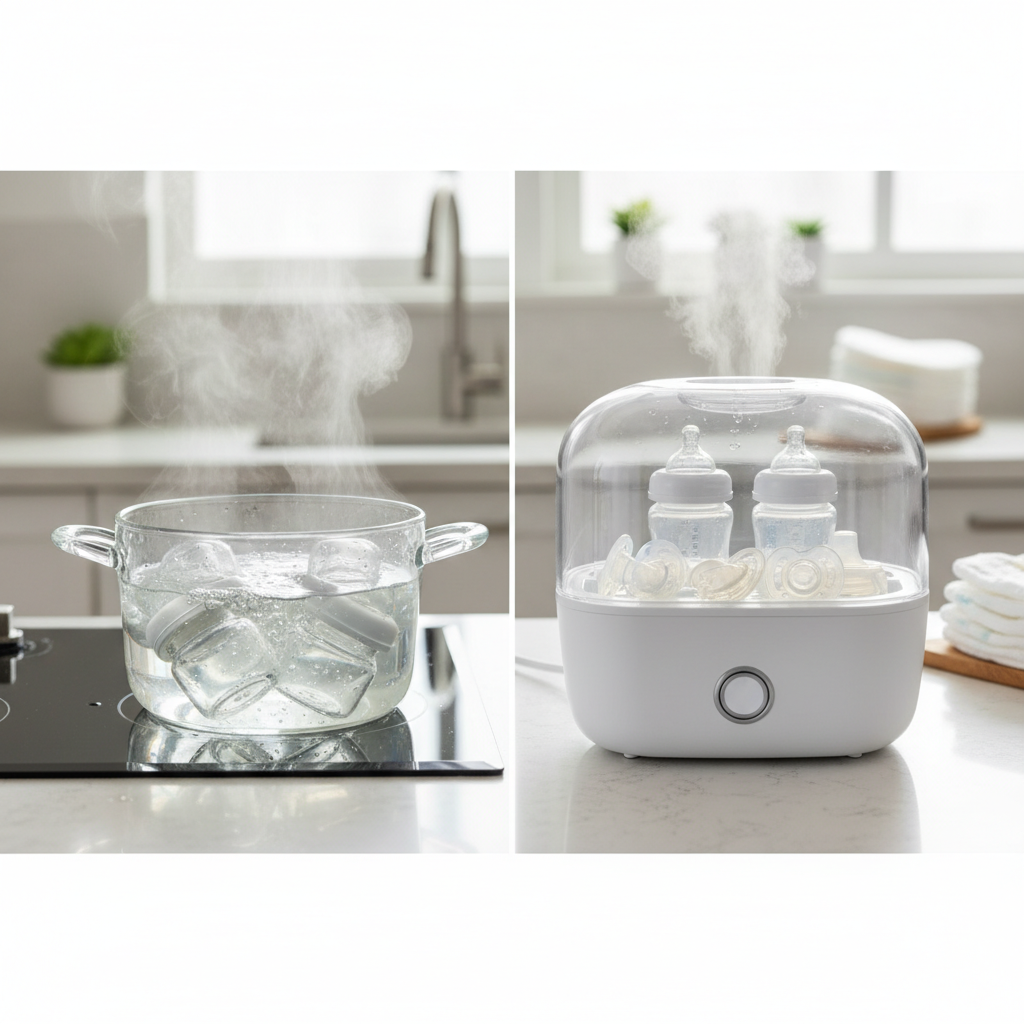
How Boiling Water Works
|
Our Picks for the Best Bottle sterilizer in 2026
As an Amazon Associate I earn from qualifying purchases.
|
||
| Num | Product | Action |
|---|---|---|
| 1 | Dr. Brown's All-in-One Sterilizer and Dryer for Baby Bottles, Parts and Other Newborn Essentials |

|
| 2 | GROWNSY Bottle Sterilizer and Dryer, Compact Electric Steam Baby Bottle Sterilizer (Esterilizador de Biberones), Bottle Sanitizer for Baby Bottles, Pacifiers, Pump Parts |
|
| 3 | Bottle Sterilizer, Baby Bottle Steam Sterilizer, Electric Baby Bottle Sanitizer with Timer for Baby Bottles, Pacifiers, Pump Parts |
|
| 4 | Momcozy Bottle Sterilizer and Dryer, Modular Nesting Space Saving Design, 6 Bottles Capacity, 4 in 1 Compact Sterilizer for Baby Bottles, Breast Pump Parts & Newborn Essentials, Drying Rack Included |
|
| 5 | Momcozy KleanPal Pro Baby Bottle Washer, Sterilizer & Dryer - All-in-One Cleaning Machine for Bottles, Pump Parts & Baby Essentials - Time-Saving & Effortless Care |
|
| 6 | Bear Bottle Sterilizer and Dryer, 2 Layers Large Electric Steam Baby Bottle Sterilizer, Fast Bottle Sanitizer and Dryer for All Bottles & Accessories, Time-Saving Design |
|
| 7 | Papablic Baby Bottle Sterilizer and Dryer Pro, Esterilizador De Biberones, Electric Steam Sterilizer for Baby Bottles, Pacifiers, and Pump Parts, Large Capacity 10 Bottles |
|
| 8 | Momcozy 3 Layers Large Bottle Sterilizer and Dryer, Fast Sterilize and Dry, Universal Bottle Sterilizer for All Bottles & Breast Pump Accessories, Touch Screen & Auto-Off Bottle Sanitizer |
|
| 9 | HEYVALUE Ease-Steam Bottle Sterilizer, Compact Baby Bottle Sterilizer, Fast One-Touch Operation (Esterilizador de Biberones), Electric Sterilizer for Baby Bottles, Baby Essentials & Breast Pump Parts |
|
| 10 | Bottle Sterilizer and Dryer, 99.999% Deep Sterilization, 6-min Rapid Disinfection, Up to 12 Bottles, HEPA Filter, All-in-One for Baby Bottles, Breast Pump Parts & Newborn Essentials |
|
To sterilize with boiling water, you typically fill a large pot with enough water to completely submerge all disassembled bottle parts. Bring the water to a rolling boil and continue boiling for at least five to ten minutes. After boiling, carefully remove the items with clean tongs and allow them to air dry on a clean, unused dish towel.
Pros of Boiling Water
- Cost-Effective: The most significant advantage of boiling is the minimal upfront cost. Most households already own a large pot, eliminating the need to purchase specialized equipment.
- Accessibility: It requires only a stove, a pot, and water, making it universally accessible, even when traveling or in situations without electricity.
- Proven Effectiveness: Boiling water is a scientifically proven method that effectively kills 99.9% of bacteria, viruses, and fungi.
Cons of Boiling Water
Despite its simplicity, boiling water comes with several drawbacks:
- Time-Consuming: The process involves bringing water to a boil, maintaining the boil for the recommended time, and then waiting for the items to cool down sufficiently before handling. This can be particularly inconvenient during late-night feeds when time is of the essence.
- Safety Risks: Handling large pots of boiling water poses a risk of accidental burns and spills, especially in a busy household.
- Potential for Bottle Damage: Prolonged or repeated exposure to intense boiling heat can degrade plastic bottles, causing them to warp, melt, or become cloudy. It can also cause print on bottles to fade and may potentially leach harmful chemicals from older plastic bottles not certified BPA-free. Teats are also prone to faster damage with this method.
- Inconsistent Sterilization: Bottles and parts can float, making it challenging to ensure all surfaces remain fully submerged and exposed to sufficient heat for the entire duration. Mineral deposits from hard water can also accumulate on bottles.
- Lack of Drying: After boiling, items need to air dry, which can be time-consuming and risks re-contamination if not dried on a sterile surface.
Modern Method: Steam Sterilizers
Steam sterilizers offer a more convenient and often safer alternative to traditional boiling, using high-temperature steam in a controlled environment.
How Steam Sterilizers Work
Steam sterilizers, whether electric or microwave-based, heat a small amount of water to produce steam. This steam then circulates within a sealed chamber, enveloping all bottle parts and accessories to kill germs. Electric models often feature automatic cycles, while microwave sterilizers rely on your microwave’s power. Many advanced electric steam sterilizers also include an integrated drying function.
Pros of Steam Sterilizers
- Speed and Efficiency: Electric steam sterilizers typically complete a sterilization cycle in 5-10 minutes, significantly faster than boiling. Many models also offer a hands-free experience with automatic shut-off.
- Enhanced Safety: These devices eliminate the need to handle hot pots and boiling water, reducing the risk of burns and spills. The exterior often remains cool to the touch.
- Consistent Sterilization: The enclosed design ensures that steam reaches all surfaces and crevices of bottles, nipples, and pump parts, providing thorough and consistent sanitization.
- Larger Capacity: Many electric steam sterilizers can accommodate multiple bottles, pump components, and other small baby items in a single cycle, which is ideal for busy parents.
- Integrated Drying: Many premium models combine sterilization with a drying cycle, meaning bottles are ready to use immediately without air-drying and the risk of re-contamination.
- Less Bottle Wear: While some sources suggest potential damage from high heat, most modern steam sterilizers are designed to sterilize effectively without causing the warping or degradation seen with boiling, preserving the lifespan of your bottles.
Cons of Steam Sterilizers
- Upfront Cost: Steam sterilizers require an initial investment, which can range from moderate for basic models to higher for multi-function units with drying capabilities.
- Counter Space: Electric sterilizers can take up a fair amount of counter space in your kitchen.
- Descaling Requirement: Regular cleaning and descaling are necessary to prevent mineral build-up, particularly in hard water areas, which can affect performance.
- Dependency on Electricity: Unlike boiling, electric and microwave steam sterilizers require a power source, making them less suitable for use during power outages or in locations without electricity.
Comparison Table: Boiling Water vs. Steam Sterilizer
| Feature | Boiling Water | Steam Sterilizer |
|---|---|---|
| Upfront Cost | Low (pot likely owned) | Moderate to High |
| Operating Cost | Potentially higher energy | Potentially lower energy per cycle |
| Sterilization Time | 10 min boil + cooling | 5-10 min (hands-free) |
| Effectiveness | Kills ~99.9% germs, some spores may survive | Kills ~99.9% germs, consistent coverage |
| Convenience | Low (requires supervision) | High (automated, hands-free) |
| Safety Risks | High (burns, spills) | Low (controlled environment) |
| Bottle Durability | Moderate-High wear/damage | Low wear/damage (if used correctly) |
| Drying | Air-dry required | Often integrated drying |
| Capacity | Limited by pot size | Generally larger capacity |
| Maintenance | Potentially mineral residue | Regular descaling required |
Key Factors When Choosing a Sterilization Method
Selecting the right sterilization method depends heavily on your unique circumstances. Consider the following:
- Your Lifestyle: If you lead a busy life, work outside the home, or exclusively pump, the hands-free convenience and speed of a steam sterilizer, especially one with a drying function, can be a significant time-saver and stress reducer. For those with a more relaxed pace or using fewer bottles, boiling might be manageable.
- Baby’s Age and Health: For newborns (under 3 months), premature infants, or babies with weakened immune systems, a method offering highly consistent and thorough sterilization, like a steam sterilizer, may provide extra peace of mind.
- Budget: If you’re on a strict budget, boiling is the most economical choice. However, factor in potential long-term costs of replacing bottles more frequently due to heat damage with boiling.
- Kitchen Space: Steam sterilizers, particularly larger electric models, require dedicated counter space. If kitchen space is limited, a compact microwave sterilizer or the simple boiling pot might be more suitable.
- Bottle Material: Most modern bottles are designed to withstand both boiling and steam sterilization. However, always check manufacturer guidelines, especially for plastic bottles, as excessive heat can still cause degradation.
Top Types of Bottle Sterilizers
While boiling water is a single method, steam sterilization comes in various forms to suit different needs:
- Electric Steam Sterilizers: These standalone units are the most popular, offering automated cycles, large capacity, and often integrated drying. They are ideal for daily, high-volume sterilization.
- Microwave Steam Sterilizers: Compact and fast, these units use your microwave to generate steam. They are excellent for quick sterilization, smaller batches, or when traveling.
- All-in-One Sterilizer-Dryers: These premium electric models combine steam sterilization with a powerful drying cycle, providing ready-to-use bottles in one go, saving significant time and effort.
How to Use and Maintain Your Bottle Sterilizer
Regardless of the method chosen, proper usage and maintenance are crucial for effective sterilization and longevity of your equipment.
For Boiling Water
- Clean Thoroughly: Before boiling, wash all bottle components (bottles, nipples, rings, caps) with hot soapy water and a clean bottle brush. Rinse thoroughly under clean running water.
- Submerge Completely: Place all disassembled parts in a large, clean pot. Ensure they are fully covered with water. Add a weight if necessary to prevent plastic parts from floating.
- Boil Safely: Bring the water to a rolling boil and maintain it for at least 5-10 minutes. Set a timer to avoid over-boiling.
- Cool and Dry: Turn off the heat and allow the water and bottles to cool naturally. Carefully remove items with clean tongs and place them on a clean, unused dish towel or paper towel to air dry completely. Do not use a dish towel to wipe dry, as this can reintroduce germs.
For Steam Sterilizers
- Pre-Clean: Always wash and rinse all bottle parts before placing them in the sterilizer.
- Load Correctly: Follow the manufacturer’s instructions for loading. Typically, bottles are placed upside down on pegs, and smaller parts like nipples and rings go into designated trays. Ensure there’s space for steam to circulate.
- Add Water: Pour the specified amount of distilled or filtered water into the sterilizer’s reservoir. Using distilled water helps minimize mineral build-up.
- Start Cycle: Close the lid and start the sterilization cycle. If your model includes a drying function, select that option.
- Cool and Remove: Once the cycle is complete and the unit has cooled down (especially for non-drying models), remove the sterile items with clean hands or tongs.
- Regular Descaling: To prevent limescale build-up, regularly descale your steam sterilizer according to the manufacturer’s instructions, typically using a white vinegar or citric acid solution.
Important Considerations When Sterilizing
- Always read the manual: Each sterilizer, whether a pot for boiling or an electric unit, will have specific instructions for optimal use and safety.
- Pre-clean everything: Sterilization is not a substitute for washing. All feeding equipment must be thoroughly washed with soap and water before sterilization.
- Avoid opening mid-cycle: Do not open the sterilizer lid while it’s running, especially for steam units, due to the risk of burns and disruption of the sterilization process.
- Allow to cool: Always let items cool completely before handling, especially after boiling or a steam cycle, to prevent burns and to maintain the integrity of plastic materials.
- Consider “sanitizing” vs. “sterilizing”: While “sterilization” aims to kill nearly all microorganisms, “sanitizing” significantly reduces their number. For healthy, older babies, thorough washing and a “sanitize” cycle in a dishwasher might be sufficient, as recommended by the CDC after the first few months.
“Ultimately, the choice between boiling and steam sterilization boils down to a balance of convenience, safety, and budget, not just sheer effectiveness. Both methods get the job done when performed correctly.”
Conclusion
Choosing between boiling water and a steam sterilizer involves weighing various factors, from cost and convenience to safety and efficiency. Both methods are effective at eliminating harmful bacteria from baby bottles, crucial for protecting your little one’s developing immune system. While boiling is a tried-and-true, cost-free option, it demands more time, constant supervision, and carries higher safety risks. Steam sterilizers, on the other hand, offer unparalleled convenience, speed, and enhanced safety, often with the added benefit of drying, making them a popular choice for busy modern parents.
Which method do you believe best fits the realities of your daily parenting routine?
Frequently Asked Questions
How often should I sterilize baby bottles?
For newborns (under three months), premature babies, or those with weakened immune systems, daily sterilization after each use is often recommended. For older, healthy infants, sterilizing before first use and then thoroughly washing with hot, soapy water after each use is generally sufficient, though daily sterilization once a day can provide an added layer of protection.
What parts of the bottle need to be sterilized?
All components that come into contact with milk or your baby’s mouth, including bottles, nipples, caps, rings, and even breast pump parts, should be sterilized. It’s crucial to disassemble all parts before cleaning and sterilizing to ensure thorough sanitization.