A steam sterilizer is an indispensable tool in many settings, from medical facilities to tattoo parlors, ensuring instruments and equipment are free from harmful microorganisms. When this crucial device begins to leak, it’s not just an inconvenience; it can compromise sterilization efficacy and pose significant safety risks. A leaking sterilizer can lead to incomplete sterilization cycles, potential burns from escaping steam, and even damage to the unit itself or surrounding environment. Addressing a leak promptly is vital for maintaining a sterile environment and ensuring the longevity of your equipment. This guide will walk you through identifying common causes of leaks and provide a step-by-step troubleshooting process to get your sterilizer back in optimal working condition.
Why is My Steam Sterilizer Leaking?
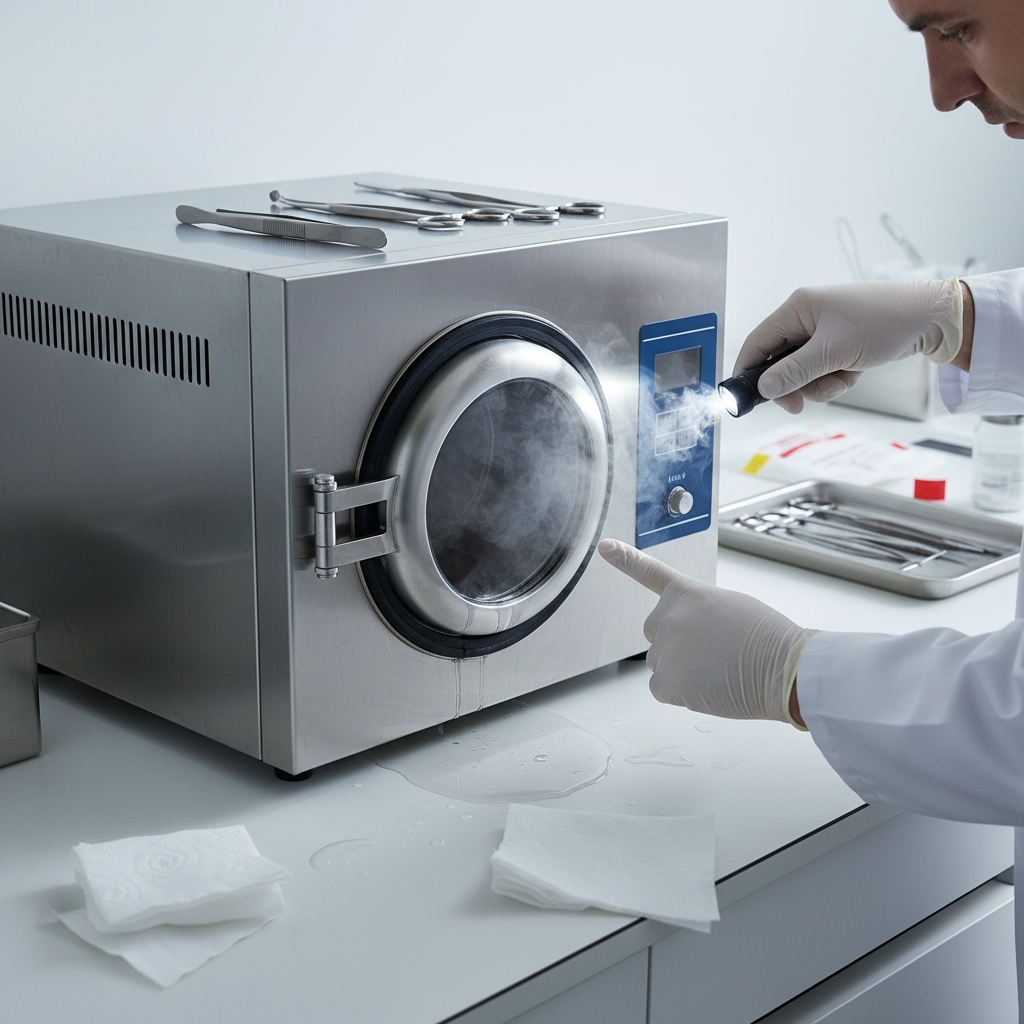
Steam sterilization relies on high-temperature, pressurized steam to effectively kill bacteria, viruses, fungi, and spores. This process requires a perfectly sealed chamber to build and maintain the necessary pressure and temperature. Any breach in this sealed system, no matter how small, can lead to steam or water escaping, which we perceive as a leak. This escape of steam means the sterilizer may not reach or sustain the critical conditions required for effective sterilization, leaving your instruments potentially contaminated. Beyond the efficacy concerns, escaping hot steam or water presents a severe burn hazard to anyone operating the machine or nearby. Furthermore, consistent leaking can lead to water damage on surrounding surfaces, corrosion within the sterilizer’s internal components, and increased energy consumption as the machine struggles to maintain pressure.
Common Causes of Leaking Steam Sterilizers
Identifying the source of a leak is the first critical step in troubleshooting. While the symptoms might seem similar, leaks often stem from distinct components within the sterilizer. Understanding these common culprits can help you narrow down the possibilities.
Damaged or Worn Gaskets and Seals
|
Our Picks for the Best Bottle sterilizer in 2026
As an Amazon Associate I earn from qualifying purchases.
|
||
| Num | Product | Action |
|---|---|---|
| 1 | Momcozy Bottle Sterilizer and Dryer, Modular Nesting Space Saving Design, 6 Bottles Capacity, 4 in 1 Compact Sterilizer for Baby Bottles, Breast Pump Parts & Newborn Essentials, Drying Rack Included |

|
| 2 | GROWNSY Bottle Sterilizer and Dryer, Compact Electric Steam Baby Bottle Sterilizer (Esterilizador de Biberones), Bottle Sanitizer for Baby Bottles, Pacifiers, Pump Parts |
|
| 3 | Dr. Brown's All-in-One Sterilizer and Dryer for Baby Bottles, Parts and Other Newborn Essentials |
|
| 4 | Bottle Sterilizer, Baby Bottle Steam Sterilizer, Electric Baby Bottle Sanitizer with Timer for Baby Bottles, Pacifiers, Pump Parts |
|
| 5 | Momcozy KleanPal Pro Baby Bottle Washer, Sterilizer & Dryer - All-in-One Cleaning Machine for Bottles, Pump Parts & Baby Essentials - Time-Saving & Effortless Care |
|
| 6 | HEYVALUE Ease-Steam Bottle Sterilizer, Compact Baby Bottle Sterilizer, Fast One-Touch Operation (Esterilizador de Biberones), Electric Sterilizer for Baby Bottles, Baby Essentials & Breast Pump Parts |
|
| 7 | Momcozy 3 Layers Large Bottle Sterilizer and Dryer, Fast Sterilize and Dry, Universal Bottle Sterilizer for All Bottles & Breast Pump Accessories, Touch Screen & Auto-Off Bottle Sanitizer |
|
| 8 | Bottle Sterilizer and Dryer, 99.999% Deep Sterilization, 6-min Rapid Disinfection, Up to 12 Bottles, HEPA Filter, All-in-One for Baby Bottles, Breast Pump Parts & Newborn Essentials |
|
| 9 | Bear Bottle Sterilizer and Dryer, 2 Layers Large Electric Steam Baby Bottle Sterilizer, Fast Bottle Sanitizer and Dryer for All Bottles & Accessories, Time-Saving Design |
|
| 10 | Papablic Baby Bottle Sterilizer and Dryer Pro, Esterilizador De Biberones, Electric Steam Sterilizer for Baby Bottles, Pacifiers, and Pump Parts, Large Capacity 10 Bottles |
|
The door gasket is often the primary suspect when a steam sterilizer begins to leak. These rubber or silicone seals are designed to create an airtight and watertight barrier between the sterilizer’s door and its chamber, crucial for building and holding pressure. Over time, due to repeated use, exposure to high temperatures, or improper cleaning, gaskets can dry out, crack, become brittle, or lose their elasticity. A compressed or damaged gasket can no longer form a tight seal, allowing steam or water to escape, typically around the door frame. Beyond the main door gasket, other internal seals within the chamber or around access panels can also deteriorate, leading to leaks.
Faulty Valves
Steam sterilizers contain several valves that control the flow of water and steam throughout the sterilization cycle. A malfunction in any of these can lead to leaks:
- Fill Valve: This valve controls the flow of water into the chamber or reservoir. If it becomes faulty, it might not close completely, leading to water leaking back into the reservoir or out from beneath the unit.
- Vent Valve: The vent valve is responsible for releasing air and steam during specific phases of the cycle. If it’s stuck open or damaged, excessive steam might escape from the condensing coil spout or other exhaust points.
- Safety Valve: Designed as a crucial safety feature, the pressure relief valve opens to release excess pressure, preventing dangerous over-pressurization. If this valve becomes faulty, it might prematurely open or fail to seal properly after opening, causing steam to escape.
- Air Valve: Similar to the vent valve, a malfunctioning air valve can contribute to steam escaping from exhaust points.
Loose or Damaged Connections
The intricate network of piping and connections within a steam sterilizer carries water and steam under pressure. Over time, or due to vibrations and thermal expansion/contraction, these connections can loosen. A loose fitting or a cracked pipe can create a pathway for steam or water to escape. Visible drips, puddles, or excessive steam originating from beneath the unit or from internal panels often point to issues with these connections. Regular inspection of all accessible tubing and fittings for signs of corrosion, wear, or looseness is an important part of maintenance.
Incorrect Water Levels or Quality
While not a direct cause of a mechanical leak, issues with water can manifest as excessive moisture or steam. Using tap water instead of distilled water can lead to mineral buildup (scale) within the sterilizer, which can clog valves, coat heating elements, and impede gasket performance. Furthermore, overfilling the water reservoir can cause water to spill or seep into areas it shouldn’t, mimicking a leak. Always ensure you are using the correct type and amount of water specified by your sterilizer’s manufacturer.
Step-by-Step Troubleshooting Guide
When you detect a leak, it’s essential to approach the problem systematically and safely. Always prioritize your safety before starting any troubleshooting steps.
Safety First: Before attempting any inspection or repair, always turn off and unplug the steam sterilizer from its power source. Allow the unit to cool completely to prevent burns from hot surfaces or escaping steam. Wear appropriate protective gloves if necessary.
-
Identify the Leak Location:
- Visual Inspection: Carefully observe where the water or steam is escaping. Is it coming from around the door, from beneath the unit, from a specific spout, or an internal component?
- Run a Test Cycle (with extreme caution): If the leak isn’t obvious when cold, you might need to run a brief cycle. Stand at a safe distance and carefully observe where the steam or water emerges. Never reach into or touch the sterilizer while it’s operating with a leak.
- Check for Puddles: The location of puddles can indicate the general area of the leak.
-
Check the Door Gasket:
- Cleanliness: Often, debris, mineral buildup, or residue can accumulate on the gasket, preventing a proper seal. Wipe the gasket thoroughly with a soft cloth and a mild detergent, ensuring no particles are left.
- Inspection: Examine the gasket for any signs of damage: cracks, tears, hardening, excessive compression, or areas that appear flattened or brittle.
- Replacement: If the gasket shows any signs of wear or damage, it must be replaced. Refer to your sterilizer’s manual for specific instructions on how to remove and install a new gasket correctly, ensuring it is seated perfectly without twists or pinches.
-
Inspect Valves:
- Visual Check: Look for any visible damage, cracks, or loose components on the external parts of the fill valve, vent valve, air valve, and safety valve.
- Bubble Test (for fill valve): If you suspect the fill valve is leaking back into the reservoir, observe the water in the reservoir during a cycle for bubbles originating from the fill line. This indicates a faulty valve.
- Excessive Steam from Spout: If there’s excessive steam escaping from the condensing coil spout during phases when it shouldn’t (e.g., beyond the vent cycle), the vent or air valve might be at fault.
- Safety Valve: Check the pressure relief valve for any constant drips or hissing, which means it might be stuck open or faulty.
-
Examine Connections and Hoses:
- Tightness: With the unit unplugged and cool, gently check all accessible hoses and fittings for looseness. Using an appropriate wrench, carefully tighten any connections that appear loose, but avoid over-tightening which can cause damage.
- Damage: Inspect hoses and pipes for cracks, kinks, or signs of wear and tear. Damaged hoses will need to be replaced.
-
Verify Water Level and Quality:
- Distilled Water: Always use distilled water. If you’ve been using tap water, consider flushing the system and switching to distilled water to prevent future mineral buildup.
- Correct Level: Ensure you are filling the reservoir to the manufacturer’s specified level, neither overfilling nor underfilling.
| Component | Potential Leak Sign | Troubleshooting Action |
|---|---|---|
| Door Gasket | Steam/water around door frame | Clean, inspect for damage, replace if worn/cracked |
| Fill Valve | Water leaking back to reservoir (bubbles) | Inspect for damage, clean, or replace |
| Vent/Air Valve | Excessive steam from condensing coil spout | Inspect for damage, clean, or replace |
| Safety (Pressure Relief) Valve | Constant dripping/hissing, steam escaping | Inspect, clean, or replace (professional intervention often needed) |
| Piping/Hoses/Connections | Drips/puddles beneath unit, visible cracks/looseness | Tighten connections, inspect for damage, replace parts |
Preventative Maintenance Tips
Consistent maintenance is key to preventing leaks and extending the life of your steam sterilizer. A proactive approach can save you time, money, and the frustration of dealing with unexpected breakdowns.
- Regular Gasket Cleaning and Inspection: Make it a habit to wipe down the door gasket after every few cycles, or at least daily, to remove any residue. Periodically, perform a thorough visual inspection for signs of wear, hardening, or cracking. Replacing gaskets before they completely fail can prevent leaks and ensure consistent sterilization.
- Use Distilled Water Exclusively: This is perhaps the most crucial tip. Tap water contains minerals that will, over time, accumulate as scale inside the sterilizer’s chamber, valves, and tubing. This buildup can clog components, impede valve function, and accelerate gasket deterioration, all of which contribute to leaks.
- Follow Manufacturer’s Maintenance Schedule: Your sterilizer’s manual will outline specific cleaning protocols, part replacement intervals, and inspection points. Adhering to this schedule is vital for optimal performance and preventing issues.
- Avoid Overloading the Chamber: Overloading can obstruct steam circulation and put undue stress on the door and its seal, potentially leading to leaks or inefficient sterilization.
- Proper Door Closure: Always ensure the sterilizer door is closed firmly and correctly, engaging all latches as designed. Forcing the door or not closing it properly can damage the gasket and compromise the seal.
“A well-maintained steam sterilizer is a cornerstone of safe and effective practice. Ignoring small signs of wear, especially with gaskets and water quality, can quickly escalate into larger, more costly problems.” – Dr. Alistair Finch, Biomedical Equipment Specialist
When to Call a Professional
While many minor leaks can be resolved with basic troubleshooting, there are instances when professional intervention is not just recommended, but necessary. Recognizing these situations can prevent further damage to your sterilizer and ensure your safety.
- Inability to Locate the Leak: If you’ve followed the troubleshooting steps and still can’t pinpoint the source of the leak, a trained technician has specialized tools and knowledge to diagnose elusive issues.
- Persistent Leaks After Part Replacement: If you’ve replaced the gasket or tightened connections, but the leak persists, it indicates a more complex underlying problem that requires expert assessment.
- Internal Component Damage: Leaks stemming from internal piping, heating elements, or advanced control circuitry are beyond the scope of typical user repair. Attempting to fix these without proper training can be dangerous and void your warranty.
- Safety Concerns: If you observe any electrical issues, excessive pressure fluctuations, or a significant, uncontrollable steam escape, immediately power down the unit and call a professional. Never attempt to operate a sterilizer that poses a safety risk.
- Warranty Considerations: For newer units, attempting self-repair for anything beyond basic maintenance might void your warranty. Always check your warranty terms before proceeding with significant repairs.
Important Notes When Using Your Steam Sterilizer
Operating a steam sterilizer effectively and safely goes beyond just troubleshooting leaks. Adhering to operational best practices ensures reliable performance and longevity.
- Always read your sterilizer’s user manual thoroughly before initial use and refer to it for any questions or issues. The manual contains model-specific instructions and safety warnings that are crucial for proper operation.
- Ensure all items to be sterilized are thoroughly cleaned and rinsed free of detergents or residues before placing them in the chamber. Any organic matter or chemical residue can hinder the sterilization process and lead to mineral buildup.
- Never attempt to open the sterilizer door or access the chamber while a cycle is in progress or if pressure is still present. Escaping hot steam can cause severe burns. Wait for the cycle to complete and the pressure to fully release.
- Allow the sterilizer to cool down completely or to a safe handling temperature before removing sterilized items or performing any maintenance. Hot surfaces can cause burns.
Conclusion
A leaking steam sterilizer is a serious issue that demands immediate attention to ensure both effective sterilization and user safety. By systematically troubleshooting common culprits like worn gaskets, faulty valves, or loose connections, you can often resolve these problems yourself. Remember the critical role of preventative maintenance, particularly the consistent use of distilled water and regular gasket inspections, in averting future leaks. However, knowing when to call a professional technician is equally important for complex issues or safety concerns. Taking a proactive and informed approach to your sterilizer’s care ensures it remains a reliable tool, safeguarding health and maintaining the integrity of your processes. What other regular maintenance checks do you find most challenging to remember for your steam sterilizer?
Frequently Asked Questions
What causes a steam sterilizer door gasket to leak?
Door gaskets commonly leak due to wear and tear, such as drying out, cracking, or becoming overly compressed. Debris or mineral buildup on the gasket surface can also prevent a tight seal, allowing steam or water to escape during a cycle and compromise sterilization.
Can I use tap water in my steam sterilizer?
No, it is strongly recommended to use only distilled water in your steam sterilizer. Tap water contains minerals that can lead to significant scale buildup, clogging internal components, damaging heating elements, and degrading seals, which ultimately causes leaks and reduces sterilizer efficiency.
How often should I replace my sterilizer’s door gasket?
The frequency of gasket replacement depends on usage, water quality, and the specific sterilizer model. As a general rule, inspect your gasket daily for signs of wear and replace it annually, or sooner if you notice cracks, hardening, or consistent leaks around the door, even after cleaning.
Why is steam coming out of the vent tube during a cycle?
Some steam is normal during the “vent” phase of a cycle as air and steam are released. However, excessive steam escaping throughout other phases or continuous heavy steam indicates a potential issue with the vent valve, air valve, or a larger pressure leak within the chamber that requires investigation.
Is it safe to operate a steam sterilizer that is leaking?
Operating a leaking steam sterilizer is generally unsafe. Leaks can compromise the sterilization process, leading to non-sterile instruments. More importantly, escaping hot steam or water poses a significant burn hazard to operators and can cause electrical damage or unit malfunction. It should be addressed immediately.
How can I prevent mineral buildup in my steam sterilizer?
The most effective way to prevent mineral buildup (scale) is to consistently use only distilled water. Additionally, follow the manufacturer’s recommended cleaning procedures, including regular chamber cleaning and descaling treatments, to remove any accumulated residue and maintain optimal performance.