As parents, caregivers, or simply individuals navigating a world increasingly aware of germs, keeping frequently touched items clean is a top priority. Pacifiers, a baby’s constant companion, and everyday essentials like keys are notorious for picking up germs. While traditional cleaning methods have their place, UV sterilizers offer a modern, efficient, and chemical-free solution. But how exactly do you harness this technology effectively and safely for these small, yet critical, items? This comprehensive guide will walk you through everything you need to know about using a UV sterilizer for pacifiers and keys, ensuring peace of mind in your daily hygiene routine.
Understanding UV Sterilization
UV sterilization utilizes ultraviolet-C (UV-C) light, a specific wavelength of ultraviolet light, to eliminate harmful microorganisms. This powerful light works by destroying the DNA and RNA of bacteria, viruses, and fungi, effectively rendering them unable to reproduce and cause infection. Unlike traditional methods that rely on heat or chemicals, UV-C sterilization is a dry process, meaning no water, steam, or harsh substances are involved, making it a gentle yet highly effective approach to sanitization. [cite: 1 (LAMPDA), 2 (Momcozy), 3 (Poled Japan)]
Why Choose UV for Pacifiers and Keys?
The benefits of UV sterilization for small, frequently used items are compelling:
- Chemical-Free Safety: For baby items like pacifiers, avoiding harsh chemicals is paramount. UV sterilizers offer a non-toxic method, reducing exposure to potential irritants. [cite: 1 (LAMPDA), 4 (PBC BABY Expo)]
- Rapid Disinfection: UV cycles are typically fast, often taking just a few minutes, which is ideal for busy parents or when you need a quick sanitization for your keys on the go. [cite: 1 (59S Pacipod), 2 (Momcozy)]
- High Efficacy: UV-C light is proven to kill up to 99.9% of germs, bacteria, and viruses, offering a robust defense against common pathogens. [cite: 1 (59S Pacipod), 3 (Poled Japan)]
- No Heat or Moisture: This eliminates the risk of burns (common with boiling or steam) and prevents moisture-related issues like mildew or damage to delicate electronics or materials.
- Convenience and Portability: Many UV sterilizers for pacifiers and small items are compact and battery-operated, perfect for tossing into a diaper bag or purse for on-the-go sanitization. [cite: 1 (LAMPDA), 5 (Élhée)]
|
Our Picks for the Best Bottle sterilizer in 2026
As an Amazon Associate I earn from qualifying purchases.
|
||
| Num | Product | Action |
|---|---|---|
| 1 | Bottle Sterilizer and Dryer, 99.999% Deep Sterilization, 6-min Rapid Disinfection, Up to 12 Bottles, HEPA Filter, All-in-One for Baby Bottles, Breast Pump Parts & Newborn Essentials |

|
| 2 | Momcozy Bottle Sterilizer and Dryer, Modular Nesting Space Saving Design, 6 Bottles Capacity, 4 in 1 Compact Sterilizer for Baby Bottles, Breast Pump Parts & Newborn Essentials, Drying Rack Included |
|
| 3 | Papablic Baby Bottle Sterilizer and Dryer Pro, Esterilizador De Biberones, Electric Steam Sterilizer for Baby Bottles, Pacifiers, and Pump Parts, Large Capacity 10 Bottles |
|
| 4 | Bottle Sterilizer, Baby Bottle Steam Sterilizer, Electric Baby Bottle Sanitizer with Timer for Baby Bottles, Pacifiers, Pump Parts |
|
| 5 | GROWNSY Bottle Sterilizer and Dryer, Compact Electric Steam Baby Bottle Sterilizer (Esterilizador de Biberones), Bottle Sanitizer for Baby Bottles, Pacifiers, Pump Parts |
|
| 6 | Momcozy KleanPal Pro Baby Bottle Washer, Sterilizer & Dryer - All-in-One Cleaning Machine for Bottles, Pump Parts & Baby Essentials - Time-Saving & Effortless Care |
|
| 7 | Dr. Brown's All-in-One Sterilizer and Dryer for Baby Bottles, Parts and Other Newborn Essentials |
|
| 8 | HEYVALUE Ease-Steam Bottle Sterilizer, Compact Baby Bottle Sterilizer, Fast One-Touch Operation (Esterilizador de Biberones), Electric Sterilizer for Baby Bottles, Baby Essentials & Breast Pump Parts |
|
| 9 | Bear Bottle Sterilizer and Dryer, 2 Layers Large Electric Steam Baby Bottle Sterilizer, Fast Bottle Sanitizer and Dryer for All Bottles & Accessories, Time-Saving Design |
|
| 10 | Momcozy 3 Layers Large Bottle Sterilizer and Dryer, Fast Sterilize and Dry, Universal Bottle Sterilizer for All Bottles & Breast Pump Accessories, Touch Screen & Auto-Off Bottle Sanitizer |
|
Types of UV Sterilizers for Small Items
The market offers various UV sterilizer designs, each suited for different needs:
- Portable/Travel Sterilizers: These are often small, compact devices, specifically designed for one or two pacifiers, bottle nipples, or other tiny baby essentials. They are battery-operated and ideal for travel or quick sanitization while out and about. Many models operate with a single button and a short cycle time. [cite: 1 (59S Pacipod), 1 (Technowize), 2 (Forbes)]
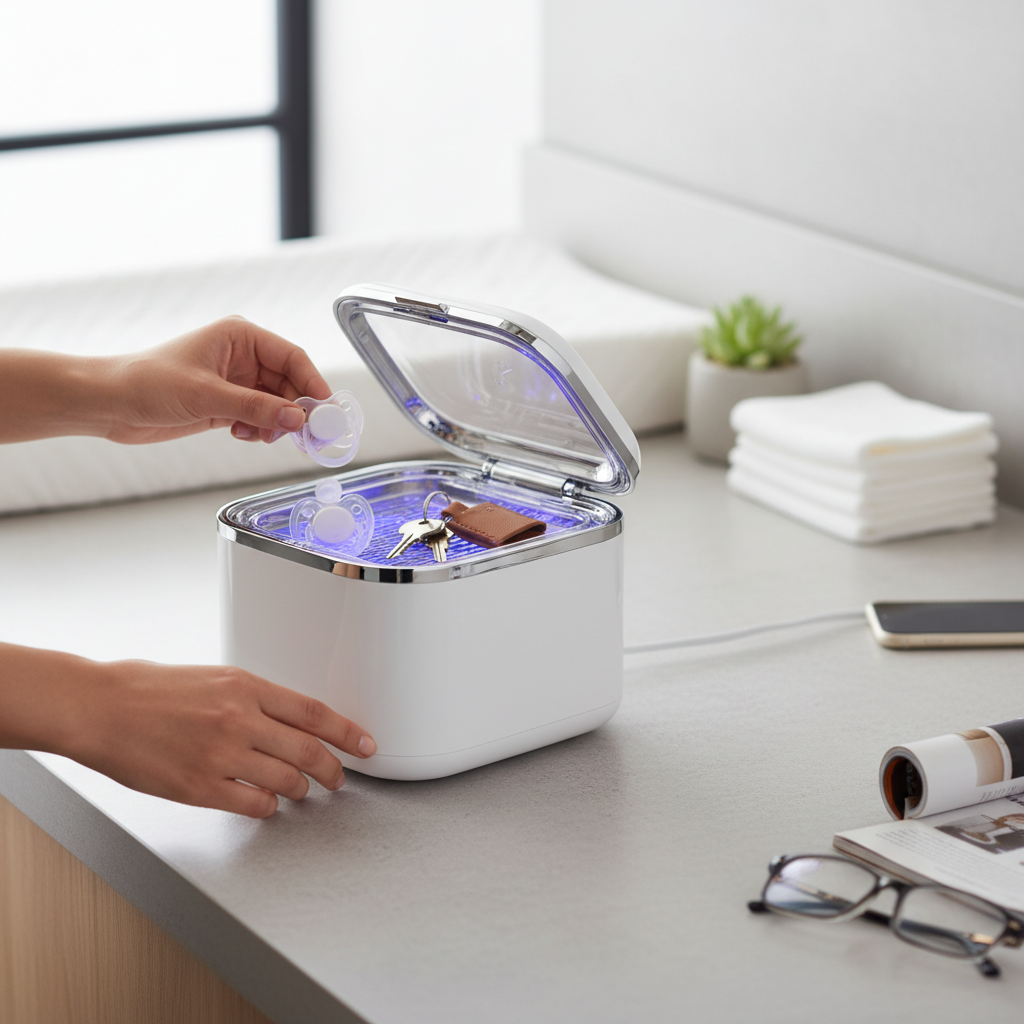
- Cabinet/Box Sterilizers: Larger units that resemble small ovens or cabinets, these can accommodate multiple pacifiers, keys, mobile phones, wallets, and even small toys. Many come with additional features like drying functions and storage modes, making them versatile for household use. [cite: 2 (Tommee Tippee), 3 (Baby Essentials), 4 (Best UV Light Sterilizers 2026 – YouTube)]
- UV Sterilizer Wands: While handheld wands exist, caution is advised. Achieving effective sterilization requires precise and prolonged exposure, and improper use can be ineffective or even harmful due to direct UV-C light exposure. For pacifiers and keys, enclosed units are generally recommended for safety and thoroughness. [cite: 2 (PSA: do not use a UV flashlight)]
Step-by-Step Guide: How to Use a UV Sterilizer for Pacifiers
Keeping your baby’s pacifier germ-free is crucial for their developing immune system. Here’s how to properly use a UV sterilizer for pacifiers:
- Pre-Clean Thoroughly: Before placing any pacifier in a UV sterilizer, it is absolutely essential to wash it with warm, soapy water. UV light primarily works on exposed surfaces and cannot penetrate milk residue or visible dirt. Skipping this step can compromise the effectiveness of the sterilization. [cite: 5 (New Beginnings), 5 (UV Sterilisers – Are they safe?)]
- Disassemble (If Applicable) and Arrange: If your pacifier has multiple detachable parts, separate them. Arrange the pacifier(s) inside the sterilizer, ensuring they are not overlapping or touching each other. This allows the UV light to reach all surfaces for comprehensive disinfection. Most sterilizers have racks or compartments to aid in proper placement. [cite: 5 (New Beginnings), 2 (Tommee Tippee)]
- Place in Sterilizer: Carefully put the pre-cleaned and arranged pacifier(s) into the UV sterilizer chamber.
- Close and Activate: Securely close the lid or door of the sterilizer. Most devices have a simple one-button operation. Press the power or start button to initiate the sterilization cycle. You might see a blue glow or an indicator light, signifying the UV-C light is active.
- Wait for Cycle Completion: Allow the sterilizer to complete its full cycle, which can range from 59 seconds to several minutes depending on the model. The device will usually beep or display a notification when finished. [cite: 1 (59S Pacipod), 2 (Tommee Tippee)]
- Remove Safely: Open the sterilizer and carefully remove the pacifier. While UV sterilization is a dry process, some units with drying functions might leave items warm. Your pacifier is now ready for use. No rinsing is needed.
Step-by-Step Guide: How to Use a UV Sterilizer for Keys and Other Small Household Items
Your keys, phone, and wallet travel with you everywhere, making them hotspots for germs. UV sterilizers provide a convenient way to sanitize them:
- Pre-Clean the Items: Just like with pacifiers, wipe down your keys or other small items with a damp cloth to remove any visible dirt or grime. While UV light is powerful, it cannot penetrate layers of dirt.
- Arrange for Maximum Exposure: Place your keys, phone, or other items inside the UV sterilizer. Arrange them in a single layer if possible, ensuring that the UV light has a clear path to all surfaces. For items like keys with many crevices, consider rotating them halfway through the cycle if your device allows for manual intervention, though most box-style sterilizers are designed with reflective interiors to maximize coverage. [cite: 4 (Lemon8)]
- Place in Sterilizer: Lay the items flat in the sterilizing chamber.
- Close and Activate: Close the sterilizer lid or door tightly. Press the start button to begin the disinfection process.
- Wait for Cycle Completion: The cycle length will vary by device, often taking 5-10 minutes for comprehensive sanitization. The sterilizer will indicate when the cycle is complete.
- Remove Safely: Once the cycle is done, open the sterilizer and retrieve your now sanitized items. They should be dry and ready for immediate use.
Important Considerations for Effective and Safe UV Sterilization
While UV sterilizers are highly beneficial, keep these crucial points in mind for optimal performance and safety:
- Pre-Cleaning is Non-Negotiable: UV light sanitizes, it does not clean. Any visible dirt, food residue, or oil will block the UV-C light, rendering the sterilization ineffective in those areas. Always wash items thoroughly first. [cite: 5 (New Beginnings), 5 (UV Sterilisers – Are they safe?)]
- Ensure Full Surface Exposure: UV light only works on the surfaces it directly hits. Overlapping items or complex shapes with hidden crevices can create “shadows” where germs may survive. Proper arrangement is key. [cite: 5 (New Beginlis), 5 (UV Sterilisers – Are they safe?)]
- Material Compatibility: Most baby bottles, pacifiers, and common household items are safe for UV sterilization. However, some plastics (especially standard polypropylene) might become brittle or discolored over prolonged, repeated UV exposure. When in doubt, check the manufacturer’s guidelines for both the item and the sterilizer. [cite: 5 (UV Sterilisers – Are they safe?)]
- Safety Features are Essential: Reputable UV sterilizers designed for consumer use, especially those for baby items, include safety features like automatic shut-off when the lid is opened. This prevents accidental direct exposure to UV-C light, which can be harmful to skin and eyes. [cite: 2 (Forbes), 4 (Lemon8)]
- Bulb Life and Maintenance: UV-C bulbs degrade over time, reducing their effectiveness. Follow the manufacturer’s recommendations for cleaning and replacing bulbs to ensure continuous optimal performance. [cite: 5 (UV Sterilisers – Are they safe?)]
- Not a Medical-Grade Sterilizer: While highly effective at killing common germs, household UV sterilizers are not medical-grade sterilization devices. They provide high-level disinfection for everyday items.
- Health Authority Stance: It’s worth noting that some health authorities, like the NHS in the UK, have expressed caution regarding UV sterilizers for baby bottles due to a lack of long-term research and concerns about effectiveness on complex bottle parts. Always consider certified products and adhere to best practices. [cite: 5 (UV Sterilisers – Are they safe?)]
“UV light physically eliminates germs and bacteria from the site meaning there is no chance for bacteria to grow back or build an immunity to it like some chemical disinfectants.” – PBC BABY Expo [cite: 4 (PBC BABY Expo)]
Choosing the Right UV Sterilizer
When selecting a UV sterilizer, consider these factors:
- Purpose: Are you primarily sterilizing baby pacifiers, or do you need a larger unit for keys, phones, and other household items?
- Size and Portability: For travel or quick on-the-go sanitization, a compact, battery-operated portable unit is ideal. For home use, a larger cabinet model offers more capacity and features.
- Features: Look for additional functions like drying cycles, storage mode, and auto-shutoff safety features.
- Brand Reputation and Certifications: Choose reputable brands known for quality and safety. Check for relevant safety certifications.
- Price: Prices vary widely based on size, brand, and features. Determine your budget and needs.
Conclusion
UV sterilizers offer a convenient, chemical-free, and effective method for keeping your baby’s pacifiers and your everyday keys free from harmful germs. By understanding how UV-C light works and following proper usage guidelines, you can integrate this modern technology seamlessly into your hygiene routine. Remember, pre-cleaning is paramount, and ensuring all surfaces are exposed to the UV light will maximize effectiveness. With the right UV sterilizer and adherence to best practices, you can enjoy enhanced peace of mind, knowing your small essentials are thoroughly sanitized.
Are you ready to embrace the power of light for a healthier, cleaner environment for your family?
Frequently Asked Questions
Is UV sterilization truly safe for babies?
Yes, UV sterilizers that are certified and meet safety standards are generally considered safe for baby items. They operate without chemicals or extreme heat, and reputable models incorporate safety features like automatic shut-off to prevent UV exposure to humans. [cite: 2 (Baby Essentials), 4 (Lemon8)]
How often should I sterilize pacifiers and keys?
For pacifiers, especially for newborns or infants with developing immune systems, daily sterilization is recommended, or after each use if dropped. Keys and other frequently touched household items can be sanitized daily or as needed, particularly after being in public spaces.
Can I put anything in a UV sterilizer?
While many items are safe, it’s crucial to check compatibility. Avoid items that could be damaged by UV light, such as certain sensitive electronics not specifically designed for UV exposure, or specific plastics that might degrade. Always refer to your sterilizer’s manual and the item’s care instructions.
How long does UV sterilization take?
The duration of a UV sterilization cycle varies by device and item, but it’s typically very fast. Portable pacifier sterilizers can complete a cycle in as little as 59 seconds to a few minutes, while larger cabinet units for multiple items might take 5-10 minutes.